How To Upload Content To Your Website
It sounds simple, doesn’t it? Assuming that your website is built on a CMS (Content Management System) like WordPress, and in a way that lets you add text, image and video content to the page, it should be pretty straightforward. Just copy and paste, right? Well, not necessarily…
Publishing content is not as simple as just uploading your text and images and hitting ‘publish’. There are four key considerations you must take into account when adding new content to your site: SEO, Structure, Optimisation and Design.
Let’s cover each in some more detail.
SEO Considerations
The content on your website’s pages is primarily what Google uses to rank your site in its search results. When clients ask us why they’re not ranking for a certain keyword, more often than not it’s because there’s a variation in one of their primary keywords that doesn’t appear anywhere on their site.
For example, if you’re trying to rank for ‘Blue Suede Shoes’ but your website refers to that product as ‘Navy Casual Espadrilles, then you severely limit your chance of ranking well for the former.
It sounds obvious, but it’s true. If you want to rank for a keyword, it needs to appear in the content.
Include this keyword in several key content areas. Namely, the Meta Title, Meta Description, H1 and body content.
HINT: You should be able to manage the SEO reasonably easily if you use a plugin like Yoast for WordPress.
Meta Title
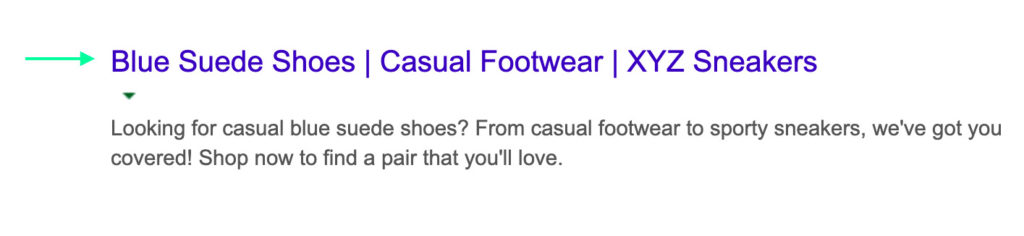
The Meta Title (or Meta Heading) is the blue text that appears on the search engine results page (SERP). Your target keyword should ideally be as close to the start of the title as possible.
Something like this would work: [Target Keyword] | [Relevant Category] | [Brand]. This might translate to ‘Blue Suede Shoes | Casual Footwear | XYZ Sneakers’. Here, you’re covering ‘Blue Suede Shoes’, ‘Blue Suede Footwear’ and ‘Blue Suede Sneakers’. But ultimately, it’s clear that ‘Blue Suede Shoes’ is your primary keyword.
Meta Description
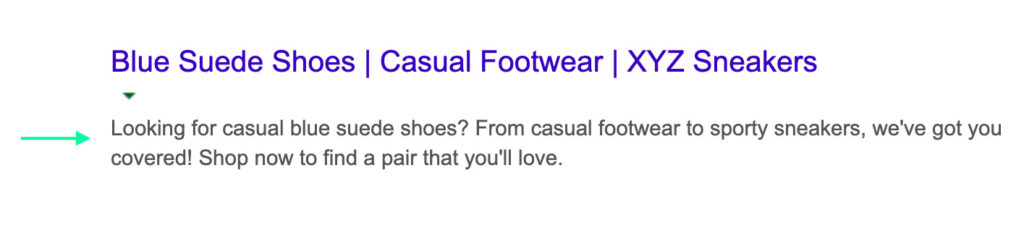
The Meta Description is the short sentence that is visible just under your heading on the SERP. The Meta Description essentially allows you to elaborate on why your page is the #1 authority on this particular topic.
Again, like the title, ensure your primary keyword is close to the beginning of the Meta Description. However, you also want to ensure that the copy resonates with your reader, so don’t go overboard. One to three instances of your keyword is plenty.
Structure Considerations
When it comes to the structure of the content, the ideal format follows:
A main heading (H1 – often the page title), a short description introducing the content of the page, then various subheadings (H2, H3, H4, etc.) and their respective body copy (the core of the content).
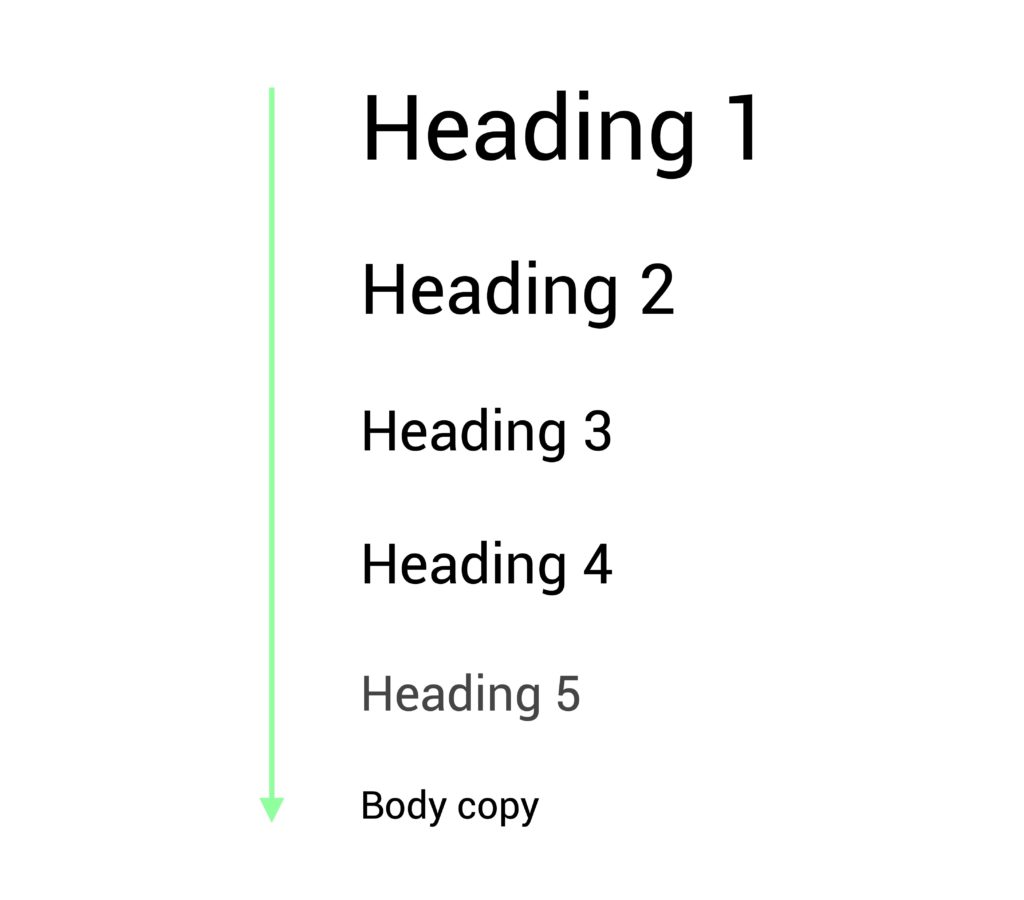
Just as your H1 summarises what the piece is all about, so too will the subheadings. They’re an ideal way to break up the content into more digestible segments – while also helping readers scan for what they’re after.
BONUS: this isn’t just useful for human readers… it’s also how screen readers (our good friend, the bot) identify the content on each page. So try and hit your keywords in each heading and subheading. Of course, an exception would be if you’re uploading a long essay or a short story, for example.
Under each subheading, the body copy should expand on what the heading has introduced. Sounds obvious, right? Well, it might be. But some users focus too much on the keywords for their H2, H3, H4s… and the body copy that follows often doesn’t end up reflecting what the subheading introduces.
If we delve into the nitty-gritty of body copy, it’s just as important to keep this section scannable. The audience likely won’t read the copy word-for-word, instead just scanning for the keywords they’re after.
To further break up the content, consider using images, videos or other elements at the end of a body paragraph. This can be particularly useful if you’re trying to explain a visual concept to the reader.
But the takeaway message? Less is more. Keep your paragraphs short and enticing. And vary your sentence length. People get bored reading the same type of sentences over and over. Why not throw in a question to keep them on their toes? Or a one-word sentence? See!
Large slabs of text are just as overwhelming. Break up paragraphs into bite-size chunks – the return key is your friend! To help, make use of charts, graphs, videos and images throughout. This will not only be useful for the visual learners, but make the overall content more digestible.
If the nature of your content means this isn’t possible, consider breaking up longer pages into smaller, shorter ones. Users can navigate to the relevant one based on what they’re after. And that way, the content is more targeted to their needs.
Finally, think about the flow. What order should the content appear in? Introduce your preliminary concepts first, and then build on them as you go. In this piece, we explained Meta Titles before Meta Descriptions, because that’s a logical order. Try doing the same in your own content.
Optimisation Considerations
When we talk optimisation, we’re talking speed. You want your page and content to load quickly, or your users will head elsewhere rather than wait.
People are impatient – so you can’t overload your page with too much content, or heavy, unoptimised images.
Images
In terms of the size of images, ideally your CMS will automatically resize and crop to what’s required for the space. If it doesn’t though, you’ll need to do it yourself. There’s lots of image resizing software to help. You can use paid tools like Photoshop or Canva (which also has a free version) or free ones like Resizing App or Be Funky.
In general, most images should be resized to about 1500px wide. Your photographer’s supplied images probably will likely be much too high resolution, and may even be the incorrect format (.tif) so don’t upload an image straight from their database. The additional data that needs to be loaded will slow down your page load speed significantly.
For format, opt for a .JPG for photos and a .PNG for graphics.
Once your .JPG or .PNG is at the right width, we recommend running them through an image optimisation tool before uploading to the CMS. This reduces the image size without compromising on quality – and you’ll be surprised how much loading time that can save in itself. Try Tiny PNG or JPEGmini.
Text & Copy
Your text content should be focused on a few things, but length and SEO implications are two of the most important.
Shorter text is better. Try to convey your message in as few words as possible. A good rule of thumb is to write your first draft, then go back and halve it. Before you post it, you might even halve it again. Cut everything unnecessary (be brutal).
People don’t like to read lots of text on a website. Include only what you need to create a compelling story and to attract SEO value.
Videos
Unfortunately, you can’t simply upload a huge video file to a page or your users will be hit with an enormous download all at once. Videos need to be progressively loaded to stream to your users.
We usually recommend hosting your video on either Youtube or Vimeo. Go with Vimeo if you require more control over privacy. If you don’t use YouTube or Vimeo, you could host your video on a CDN like Amazon.
Once your video is hosted on one of these platforms, it takes the load off your server. It will also only load the first part of the video necessary for a user to get started – plus, it will optimise the quality depending on the user’s connection speed. Bonus!
Design Considerations
When uploading content to a site, it’s important to consider what the goal is for each page. Why? Because it will inform your design decisions – like choosing what type of module or block to put on each page.
For example, is it a page that will help the user browse through a section of a site, absorbing high-level information at a glance? Or is it a more detailed page with in-depth content and information that they’ll read through carefully?
Depending on what the goal is, your design layout should inform this. It’s definitely not a ‘one-size-fits-all’ approach.
When choosing content blocks to include on a page, consider the ‘pacing’ of the information. Above, we mentioned the ideal layout is a main heading, then intro paragraph, followed by subheadings and then body copy. Your design choices should distinguish between each. For example, your main heading (H1) is going to be larger than your subheadings. And the subheadings will stand out from the body copy.
When choosing from a variety of modules or content blocks, always consider how they’ll stack on top of each other. Will there be enough white or negative space? This is incredibly important – it gives readers room to breathe.
This also offers you a chance to think about the flow of the page. Often, a block with lots of white space might look nice followed by a feature block with a background colour and a strong call-to-action. If you then follow this with another block with negative space, the reader will have some visual relief.
When it comes to visuals, ensure that your strongest images are used in hero sections. We’re talking full-width header banners or full-width image sliders. When choosing images, it’s also important to consider how the website will respond to different browser widths. Choose images with a central focal point. This way, the image won’t lose context if smaller devices crop off a section (no one wants to accidentally behead their CEO).
Congrats! You now know how to upload content to your CMS the right way. Feel free to continue to reference this guide each time you’re posting blogs or publishing sites.