How To Brief A Photographer To Take Awesome Photos For Your Website
Your creative assets can make or break the visual impact of your marketing campaign or website. A new shoot is a perfect investment to upgrade or refresh your messaging, as long as you and the photographer are on the same page!
Create the space and conversation for excellence between you and your chosen creative/s with 3 Simple Steps:
Step 1 – Research
Check out online photography sites for ideas and references
- iStock by Getty Images – iStock has a huge library to help with ideas
- 500px – Get inspired with incredible photos from diverse styles and genres around the world.
- Pexels – High-quality free stock photos, if you like any you can use them at no cost.
- Instagram – Instagram is full of incredible photographers. It takes a little bit of exploring to find them, but it’s worth it.
- Pinterest – Images can inspire, and mood boards can pull together a vision.
Check out what your competitors are doing
Checking on your competitors is a critical step. This doesn’t mean copying; instead, it means getting an idea of expectations in your industry and identifying how you could stand out.
Step 2 – Plan
Work out the photos you’ll need.
Below are some typical areas that may require photography.
- Hero photos for page headers
- Team photos
- Physical space/facilities
- Action shots
- Products and services
- Photos relevant to particular marketing campaigns
Put together a brief
You’ll need to brief your photographer well to get that GREAT result.
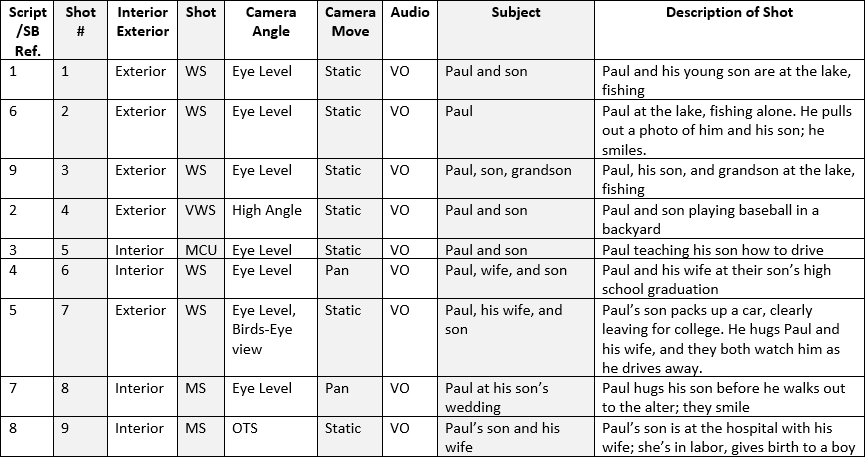
Photographers typically receive a ‘shot list’ this details the exact photos required, the style, format (landscape or portrait) and details on these shots.
You can’t expect an accurate result without a precise brief. They can only give you what you’ve asked for.
Search Google for ‘photographer shot list template’ to see examples. Include reference photos from your research to guide the photographer on any specifics.
Find a photographer and brief them.
If you don’t have a photographer, there are a few directories you can use to find someone such as the 500px directory, Photoshelter directory or Snappr directory.
All these sites can filter by your location, and you can review their folio of work before contacting them.
Our additional tips for taking great photos to use on a website.
Overcast days are better than sunny days for outdoor shots.
Sunny days have harsher light that casts shadows on faces and objects, which gives less control in the final image. You’ll see more detail in the final asset if your edit isn’t correcting drastic highlights and shadows.
Landscape orientation is more versatile than portrait
Landscape images can generally be cropped to portrait. However, it’s nearly impossible to do the opposite. Tell your photographer that landscape shots should be the default unless you especially need portrait options.
Be wary of the focal point
An essential photography rule is the rule of thirds. Still, you need to be wary of placing an object of focus too close to the frame’s top, bottom or sides, as they could end up cropped on the website. This is especially true for photos of faces. See the point below about ‘Shooting wide’.
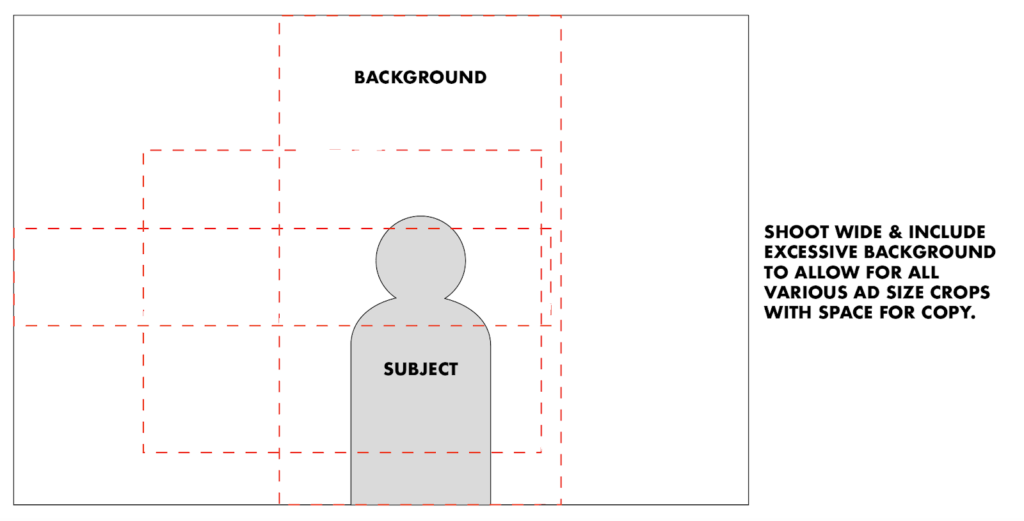
Shoot wide
Shoot Wide to allow for cropping. Due to the nature of responsive web design, your photos will likely crop at various unintended sizes.
Shooting wide also allows for freedom in the design phase. For example, if we have a selection of shots that are shot wide, you can crop the image to the focal point on one side of the image and overlay text on the other.
Blur the background
Keeping the subject in focus but blurring the background creates ‘depth of field’ or ‘Bokeh’.
Be aware that any objects or colours in your photo will compete for attention with the other content on the page. In general, it’s best to blur details that don’t present value.
Avoid Stock photos
Stock photos are tempting – they’re cheap, easy and ready to go. Unfortunately, a stock photo looks like a stock photo. This conveys an element of distrust, as it’s not a genuine reflection of your organisation.
In general, photos and videos used on your site should be accurate shots of your business.
Go with candid rather than staged
In our experience, when it comes to shots of people, candid photos are much nicer than photos that have been heavily staged.
Staged photos can look unnatural, edging towards stock photo territory, which decreases trust.
People can decipher a natural smile from a fake one. Try to capture people in the moment.
Less is more
Keep your photos simple! Don’t over-cram the frame trying to achieve too much. All of these elements will only confuse your intention.
Be wary of colours
The colours in your photos will contrast with your website design. Make sure they work with your chosen palette.
For example, if there’s a big red object in your photos, and your website is green and white, you may look like Christmas Decorations.
If your brand and website are neutral colours, like black, white and grey – you may want to introduce colour via the photos. When you do, you won’t have to worry about palette clashes.
Get some video clips as well if possible
This leads back to hiring the right photographer, but professional SLR cameras have some powerful video-capturing functionality. Some photographers may be skilled enough to take a few short clips of the designated scenes throughout the shoot. This can cut out the need for a videographer.
This could be an added level of complication, but it may prove worth asking your photographer.
If you’re looking for something polished or want to include drone footage, this will likely need a videographer.
Step 3 – Execute
Once your photographer has confirmed, ensure you’re prepared to make the most of your time.
Photographers typically charge in half or full-day blocks. If you’re underprepared and the shoot goes over time, expect to pay for a full day.
Have all of your team, models, and props ready on the day.
If you’re working with people/models, brief them across the shot list so they know what you expect of them.
Have power points and extension cables ready if you require lighting for the shots.
Important: Make sure you own the full rights to the photos you purchase and your photographer isn’t ‘licensing’ them to you.
We have had clients spend thousands on photos for a website, needing to pay thousands more to use the same images on a billboard campaign. Ensure your photos are yours to do what you want with. Get it in writing.
Once you have all of your high-res photos from your photographer, be sure to save them in a safe place on your local network that your team can access. Share a copy of them with your web development team.
You can read our other article on how to best supply these photos with your web agency to implement on your website.