How to use mini design sprints to generate brilliant ideas in just two hours
If you work in design and technology you have probably heard of the Design Sprint, a five day process for answering critical business questions through design, prototyping and testing ideas with users.
Design Sprints have been very popular among start-ups for many years for good reason. The process allows you to take a big, seemingly-unsolvable business question and solve it with real user’s feedback, all in one week. But the original design sprint, developed by Google Ventures and detailed in the book Sprint: Solve Big Problems and Test New Ideas in Just Five Days, requires the time of up to 8 team members over 5 days, all working on the same problem. With a big, business problem, we can see how dedicating time and resources to problem-solving can yield highly valuable insights and results. But what if the time-frame, budget and resources just don’t allow for 6-8 team members getting in a room and spending 40 hours each on a problem?
That’s where mini-sprints come in, a compressed version of the Design Sprint. As a designer working in a lean design team, our designers are often working on many projects at a time, making it difficult to pull whole teams out of their work for days to focus on one project. But after reading the Sprint book, there was too much value in their ideation process not to try to use it in any way we could.
We needed a sprint process that would work for us, that:
- Would work with only 2-3 team members
- Could be completed remotely
- Only requires a half day’s worth of time where we put our heads together in a single meeting, then allowing us to go away and work on the project asynchronously
- We could take and adapt to each project, using sections we could complete first and then pick up once the project was further along or had more resources
With these parameters, we came up with a super-simplified version of a design sprint, which I’ll detail step-by-step using a real life example in this article.
As well as building websites and other digital platforms for our clients, we also work on a suite of progressive web apps to help teams like ours do their jobs. One of them is Standup Timer, a simple app that allows you to automatically keep team standups running on time by allowing you to set the number of people in the team and total time for the meeting. After having a free, MVP version of this timer live for 18 months or so, we had around 5k sessions per month. Seeing that people were getting value from it, and kept returning, we decided to dedicate some of our time to improving the product with some new features. We ran a design sprint to help us focus on and prioritise new features to build.
Preparation
Set a Time, Date and Invite Team Members
At most agencies it’s difficult to find a time for everyone to dedicate to one problem without scheduling clashes and meeting fatigue, so we keep this process to two hours, done remotely through Google Meet or Zoom.
Be sure to invite team members outside of the design team like those in marketing, account/customer service, strategy, engineering, and project managers that will have interaction with the product. Although the sprint involves a bit of sketching, this doesn’t mean it’s a designer-only exercise. Some of the best ideas come from those who will be building, using or talking about a product.
Let everyone know to have a pen and loose sheets of A4 paper handy for the meeting.
Set up the Board
Most design sprints require quite a bit of background work, but if you’re working alone to prepare and facilitate the sprint, save time by putting together a template before your first sprint, which you can use and modify as you complete more sprints.
Take some time to read through each of the steps below and put together a Miro Board or Figjam board, where you can screen share and record the results of each activity so that everyone is on the same page. We prefer to use a Figma file, just so that we can have our sprint information and our designs in one place. This works best if you, the facilitator and scribe, are a designer that uses Figma day-to-day you’re able to quickly record what is happening in the session on the fly.
Map out headings for the following in your file, and fill in with the details and question prompts:
-
- Define the Long Term Goal
- List the Sprint Questions
- The Map
- Talk to the Experts + Research and Analytics
- How Might We?
- Target
- Sketch
- Decide on prototype
The traditional and full design sprint method then goes on to have the participants decide, storyboard, prototype and test the ideas, but in our mini-sprints, we have our design team go off and design, test and prototype after the meeting. It might seem like a lot of steps to get through in a two-hour meeting, but don’t worry too much about sticking to the process precisely. Our purpose is to gain as many insights and ideas as possible, and to prompt the team to think deeply about the problem.
Analytics
To further prepare for the meeting, take a dive into Google Analytics and any other software you might have that can hep you bring any insights to the sprint, such as heat maps and session recording software like Full Story. This will allow you to identify any clear problems prior to the meeting, which you can bring up for discussion during the Talk to the Experts section.
The Two-Hour Sprint Meeting
1) Explain the Sprint
Start with introductions or skip if everyone knows each other. Introduce the design sprint process to the team and give a tour of the Miro, a Figma file or Figjam board, briefly describing each activity. As the facilitator, you’ll share your screen so everyone can see the notes you are taking in the meeting.
2) Start by defining the Long-Term Goal
This is a great activity to start with to get everyone primed for thinking about the future dream state.
“When a big problem comes along, like the challenge you selected for your sprint, it’s natural to want to solve it right away. The clock is ticking, the team is amped up, and solutions start popping into everyone’s mind. But if you don’t first slow down, share what you know, and prioritize, you could end up wasting time and effort on the wrong part of the problem.”
Jake Knapp – Sprint: How to Solve Big Problems and Test New Ideas in Just Five Days
As a group, brainstorm and answer the questions:
- Why are we doing this project?
- Where do we want to be in six months, a year or five years from now?
- Try not to think about any limitations at this stage and think about the biggest opportunities for the project or product.
Others might do this activity in a much more structured way, but to save time we simply open the questions to the team, making sure everyone has a chance to contribute. Take your notes on the board, you can do this by adding simple dot points or sticky notes.
3) List the Sprint Questions
In the spirit of trying gain as many insights and ideas as possible, try to phrase everything as a question in this process. This will help you keep open-minded instead of only thinking of obstacles and problems in the way of your solution.
As a group, brainstorm and answer the questions:
- What questions do we want to answer in this sprint?
- To meet our long-term goal (that we just outlined) what has to be true?
- How can we phrase that as a question?
- Imagine we travel into the future and our project failed. What might have caused that?(Think about this from both a product perspective and an operations perspective. Is it not enough, staff, time or resources? Is it potentially getting in too deep with an unknown technology? Is it an external risk, like a change in appetite in the public for your product?)
4) The Map
With everyone prepped on the sprint questions and ideal future state, you can begin on the map. The map is a simple tool to refer back to during the rest of the sprint meeting, through to testing the product with users.
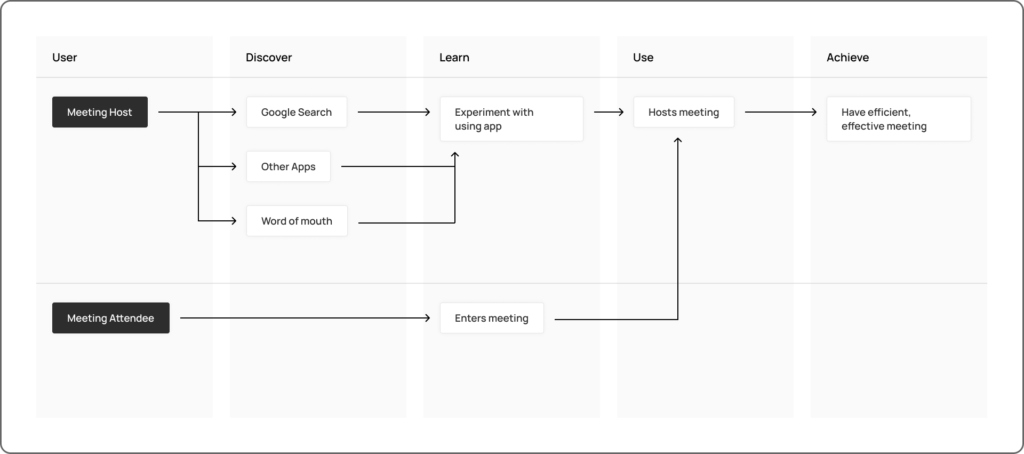
Start on the left and place here the ‘key actors’. These are the people that will interact with your product. In our example of Standup Timer, our key actors were the “Host”, and the “Attendee”.
Then, on the right, place the ‘ending’. This is the goal of your product or app. In our case, this was to “Have an efficient and effective meeting.”
Once these are in place, you can look at the map as a super-simplified, visual map of the product. We like AJ&Smart’s way of breaking it down, into 4 columns: Discover, Learn, Use and Achieve. These prompts are great to help your team fill out the map, and link it up to the goal on the far right. When the map is done, move onto the next activity.
This is what our map looked like for Standup Timer:
5) Talk to the Experts
A useful step in the sprint process is talking to the experts, a series of Q&A-style interviews where you might have stakeholders from the CEO, to customer service, design, engineering and marketing experts who have worked with or on the product before share their knowledge about the product and problem.
In our mini-sprints, we condense this down and instead use this time to open the floor to team to talk about previous releases of any features and bring up any feature requests from real users. We also use this opportunity to discuss any insights from the analytics that the facilitator has prepared ahead of time. Feel free to jump over to the actual product while screen sharing to make sure everyone can visualise a demo of the issues the user might be facing.
6) How Might We?
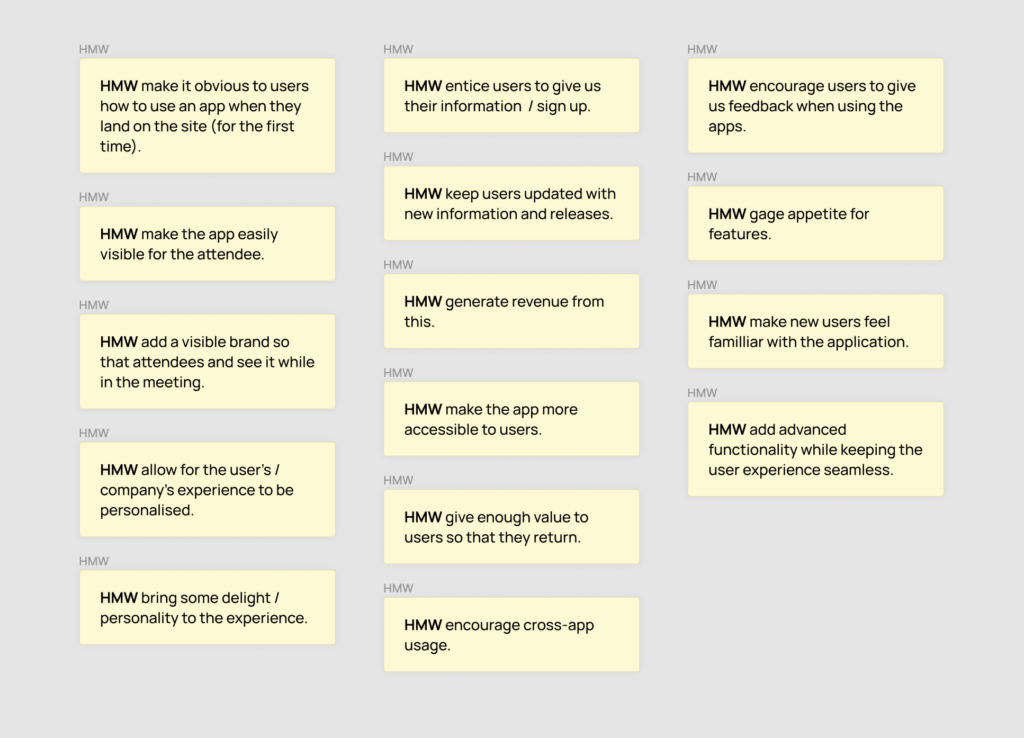
Now that we have all the information we need, the whole team will brainstorm ‘How Might We’ questions to get everyone’s notes and insights into actionable goals that everyone can see on the board. The ‘How Might We’ phrasing allows us to frame everything as an open-ended question, forcing us to look for opportunities rather than being stumped by potential problems.
In a traditional design sprint you might all write these down on your own sticky notes and vote on them in the end. In our sprints we simply open the floor for any HMWs, making sure everyone has the opportunity to contribute. Place each HMW on its own sticky note on the Figma or Miro board.
Here’s what our How Might We’s looked like once we were done.
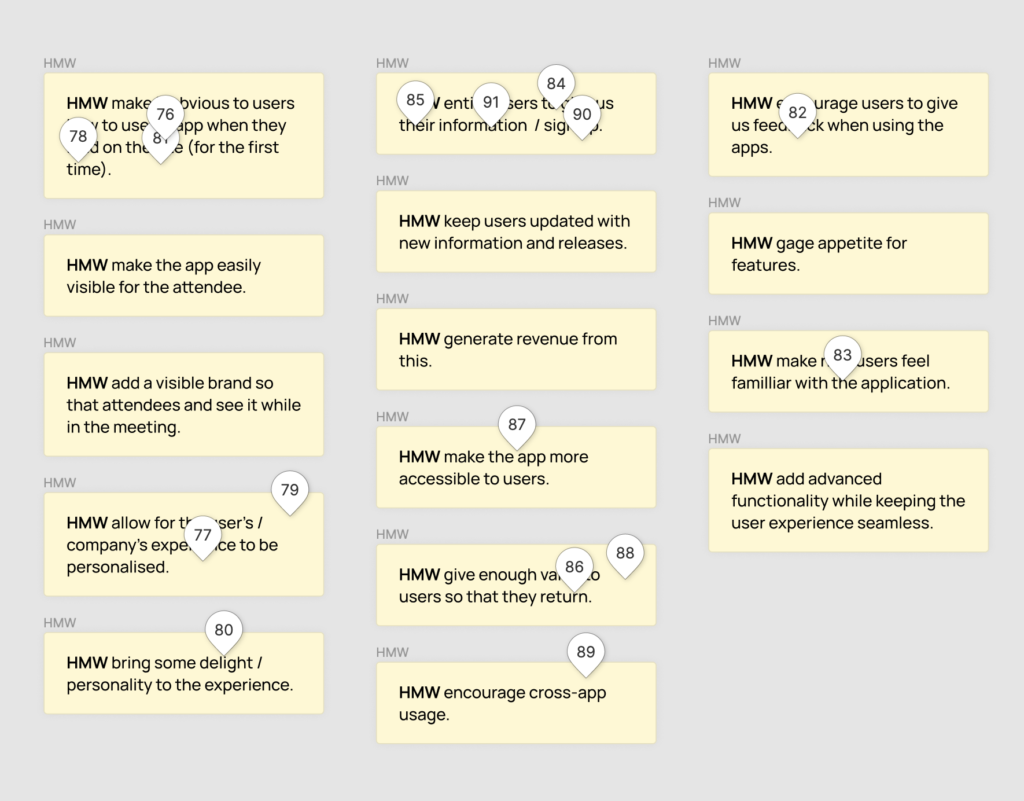
7) Pick your Target
Next comes deciding where to focus the sketches. We do this through a simple ‘blind’ vote, having each person has two votes to drop on the HMWs that they think would be the most impactful to focus on in this sprint. The ‘Decider’, who is usually the person who is in charge of the resources (product manager, Creative Director or CEO), can have four votes. Each person (if in Figma) can drop a comment on the HMWs as votes.
Once everyone is done, go into comment mode to see the comments and pick the two HMWs with the most votes.
Our HMWs with comments as votes:
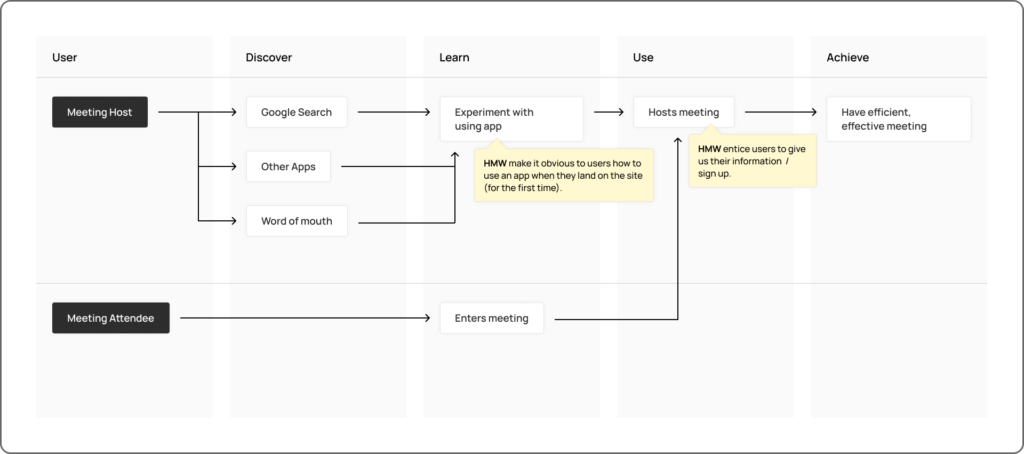
Then, plot these HMWs on the map to show where they happen in the process:
8) Sketch
Now, this is the part where ideas start coming together. Each person will have the HMW that they are assigned. Make sure you have at least 30-40 minutes left of time to complete the sketching portion. We’ve turned the original sprint’s Four-Step Sketch into a three-step sketch for this exercise.
Step 1: Ideas (10 min)
Here’s where you’ll start using paper. Set a timer for 10 minutes and have each person in the sprint write down their HMW at the top, then write down, on paper, as many ideas as possible to solve the issue. This can look like a series of written dot points, or a mind map, whatever you need to get as many ideas out as quickly as possible.
Step 2: Pick your Favourite (1-2 min)
Once the 10 minutes is up, stop and have everyone read over their notes and circle their favourite/best idea.
Step 3: Crazy 8s (8 min)
Next, get a new sheet of paper and fold it into eight. On one side of the paper, you’ll have eight minutes, one minute per sketch, to sketch out 8 versions of the idea. Assure everyone not to worry about the messiness or detail in their sketch, no one will see this sketch but them.
As the facilitator you’ll probably be doing your own sketches too, so if you need something handy to help you automatically keep to time, use our Standup Timer (I realise this is very meta). Set a meeting for 8 people, each speaking for 1 minute, and let the timer take care of the rest. We used it in our sprint and it worked a treat.
Once you’re done with 8 sketches, allow everyone to pick their top idea from this exercise. This idea is the one they will flesh out in the solution sketch.
Step 4: Solution Sketch (10-15 min)
Finally, the solution sketch. Each person takes around 10 minutes to carefully sketch out their best solution from Crazy 8s. Make sure everyone’s HMW is written at the top. These need to be detailed, thought-out and easy to understand. Include sketches to show the idea and text to explain it.
One the time is up, have each person drop their sketch into the file and present it to the team. Allow other team members to ask questions and an open floor to discuss solutions.
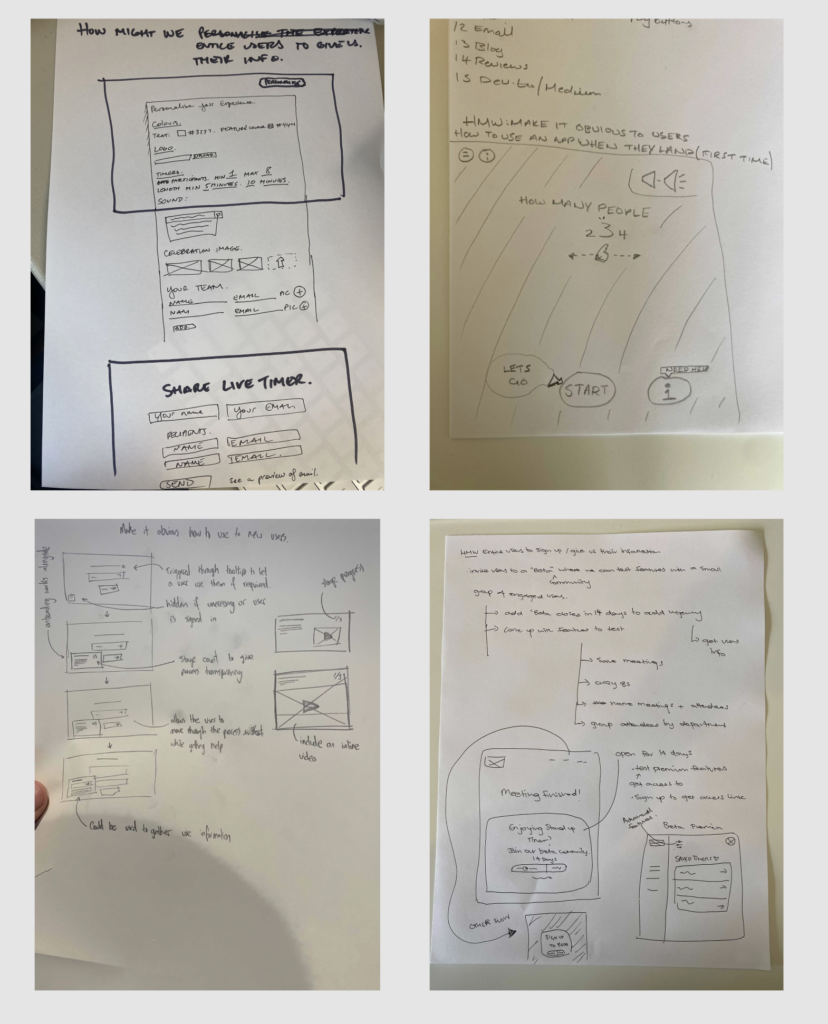
Here are some of our solution sketches from our sprint on Standup Timer:
9) Decide on prototype
After each team member has presented their idea, decide on the solution sketch that the design team should wireframe and prototype to test. Depending on the amount of resources for the project or how strong you thought the ideas were from the solution sketches, this could be all the ideas or just one. Discuss this among the team or vote again by using Figma comments.
10) Next Steps: Wireframe, Prototype, Test
As mentioned, in a traditional sprint the prototyping and testing will take place over the course of the five-day sprint, with everyone involved throughout the week. For our sprint, our meeting stops here. This allows us to get the most out of a two-hour session and gives our design team the chance to work through solutions by wireframing, prototyping and running user tests on their own. This works best for us when our team is working remotely, as we are right now.
Using this Process
Working together on any problem will always yield some interesting insights. When our team is stuck on a problem, or simply want to put our heads together to see how we can make a product better for users, we use this process to kickstart building and designing new functionality so we can prototype and test as soon as possible. Steps 1-7 help us put our heads together to figure out the final goal, the broad pain points, and reign in our ideation process to make sure it addresses the problem in a strategic manner. We then ensure we test all our ideas with real users using the ideas we’ve derived from the sprint. We hope you can use this guide as a way to generate new ideas for your next project.